The Pane Startup
The pane Startup is designed to manage special settings of the operating system or of the computer’s firmware, which won’t affect normal operations, but only the startup phase of macOS.
Notes on Macs with Apple Silicon
Macs with Apple Silicon use a different startup sequence and technical design as Macs with Intel processors. The following options won’t be available if you are using a Mac with Apple Silicon:
- Startup Mode
- Use special OS for next start
- Optimize system for server operations
- Diagnostic options
Options
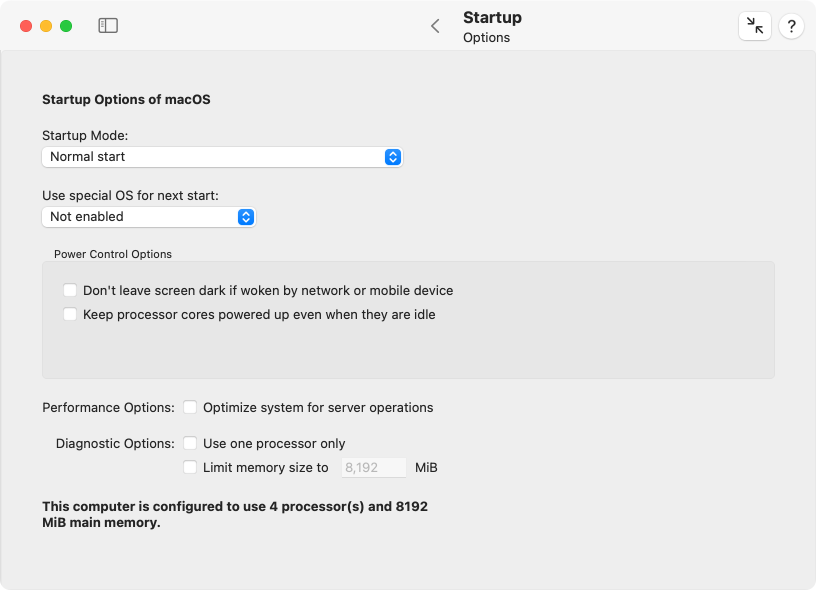
macOS is supporting different startup modes that can be preconfigured with TinkerTool System:
- Normal start: the default setting. The operating system will start with graphics mode and all features enabled.
- Verbose mode: macOS will display text messages when executing the first phase of the startup, the start procedure of the kernel. After that phase, the system will switch back to graphics mode and continue normal operations. Shutting down the system will also be accompanied by diagnostic messages in text mode.
macOS can also start in Safe Mode which means that it will start normally, but only with a minimum set of features enabled. All third-party startup components like drivers, kernel extensions, or background services will remain inactive. This mode is helpful if you installed bad system software or drivers which prevent macOS from starting up correctly. In addition, nearly all system and user caches will be cleared. Safe mode can be activated temporarily by holding down the shift key (⇧) during startup. It does not make sense to enable Safe Mode permanently.
In addition to these startup modes for the launch of the main operating system, you can instruct your Mac not to choose the main system for the next restart, but to select a special operating system for maintenance purposes. This selection takes effect only once, for the following startup. Available options are:
- Not enabled: The normal operating system will be started.
- Recovery system: The mini operating system to recover the main operating system will be started from the disk of the local computer. If multiple operating systems are available, the Mac will select the recovery system associated with the current startup volume.
- Recovery system via Internet: as before, but the system will be loaded from Apple’s servers in the Internet. A working Internet connection is required. With this setting, it will be possible to even conduct maintenance operations if the built-in disk of the Mac is defective or it should be erased completely.
- Apple Diagnostics: The application for testing the hardware of the individual Macintosh model will be launched from the disk of the local computer. This program allows a quick assessment whether all components of the Mac are working correctly.
- Apple Diagnostics via Internet: as before, but the application will be loaded from Apple’s servers in the Internet. This way you can check the hardware even in cases where the diagnostic program on the local disk has been damaged.
Power Control Options
Modern versions of macOS are optimized to detect whether a real user or another external event is waking a Mac from sleep mode. If not an actual person sitting in front of the screen is responsible for the wake-up, the screen can remain dark. This saves energy and avoids unwanted light effects. Such a “dark wake” happens if, for example, a client in the network accesses a service of the sleeping Mac, or a mobile device is attached to one of the Mac’s USB ports to charge it.
For some use-cases however, it might be desired to wake the Mac “fully”, i.e. together with its screen, and keeping it active for a longer period of time. One example would be a Mac working as a multimedia player, mounted together with a TV at a poorly accessible place, and configured to be activated remotely via network. It should be possible to wake the Mac without the keyboard to play a movie and keeping it switched on for some time. To achieve such a behavior, set a check mark at Don’t leave screen dark if woken by network request or mobile device.

Keep processor cores powered up even when they are idle: By default, modern computers shut all processor cores down which are currently not in use. “Not in use” means that the process scheduler has not enough jobs to keep all cores busy for a complete scheduling time slice, which usually lasts 10 milliseconds. For the time period where there is nothing to do (processor load per core is less than 100%), the affected cores will be powered down into sleep mode. Keeping the cores always powered up is mainly useful for diagnostic purposes only. It has no positive effect on system performance. The system might consume significantly more energy and produce more heat when this feature is activated.
Performance Options
macOS can reconfigure its kernel to optimize itself for working as a server. This means certain system parameters, like the strategy for reserving network and file caches, or the multi-threading characteristics will by modified in a way so that typical server applications gain better performance. Such server applications typically run without a visible user interface in the background and use many threads mainly doing network and file operations. On the other hand, a standard installation of macOS is usually optimized to give the frontmost application running on the graphical user interface the best speed behavior.
If you like to change the default and give typical server jobs better performance, set a check mark at Optimize system for server operations. After restarting the computer, the kernel will respect the new setting.
Apple may change the exact meaning of this setting any time without further notice.
Diagnostic Options
Additional options are available for diagnostic purposes:
- Use one processor only: causes the operating system to only use one CPU core in case more than one processor (or core) is available in the system.
- Limit memory size to: macOS can be forced to use less RAM than is available in the system. Using this feature can be helpful for software developers to simulate the effects of low memory situations. It can also help to diagnose problems with defective memory modules.
Changing Options
To use one of the listed options, perform the following steps:
- Open the sub-item Options of the pane Startup.
- Activate or deactivate the listed options as desired.
Job Overview
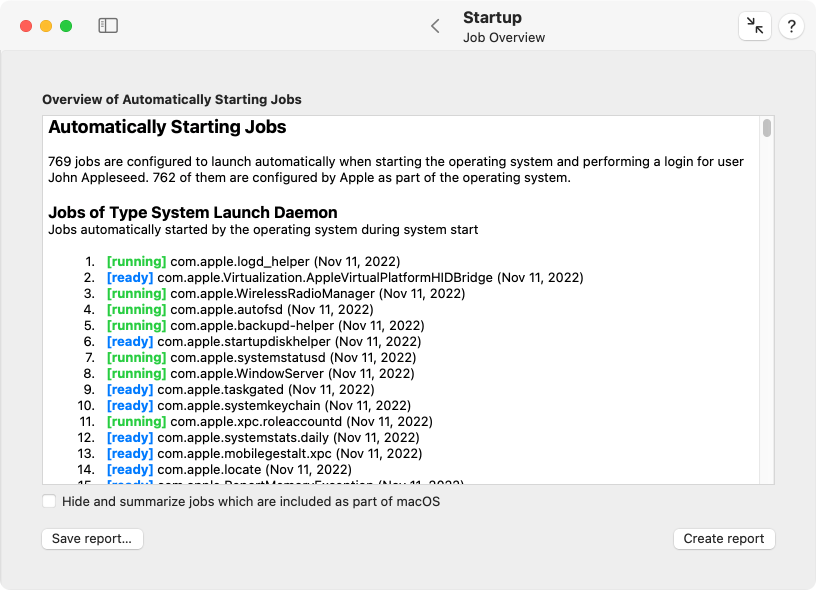
When the operating system is starting and the user logs in, a high number of system services and user applications is started automatically. TinkerTool System can help you to get an overview of all automatically starting components which become effective for your personal user account. It will also analyze all auto-starting jobs, comparing their configuration entries with their current status. If a mismatch is found, the application will warn you. This way, you can easily detect invalid or outdated configuration entries. Additionally, you can see whether specific jobs have failed due to technical problems, or if the operating system was forced to stop system services due to temporary lack of memory.
To let TinkerTool System create a report of all automatically starting jobs, perform the following steps:
- Open the sub-item Job Overview of the pane Startup.
- Click the button Create report.

After a few seconds, the report will appear in the text view. By using copy/paste, you can transfer it into other applications if necessary. To filter out all “normal” jobs which are preconfigured by Apple and are a standard part of the operating system, set a check mark at Hide and summarize jobs which are included as part of macOS. You can save the report currently shown in the window by clicking the Save report… button.
The configuration of auto-starting jobs is part of different launch behaviors and different realms: So-called daemons are services running in the background which can launch as soon as the operating system is running, even when no user is logged in yet. So-called agents are background services that run for each user session. They can launch as soon as a user has logged in, and are automatically quit when that user logs out. If multiple users are logged in, multiple sets of agents run simultaneously for each session. Daemons and agents can be defined by the operating system itself (system), or as third-party entries for all users of the computer (computer), or for a particular user (user), a case which is then of course limited to agents.
A user can also add and remove auto-starting applications herself, using the setting Login Items in the General pane of System Settings, or via the context menu of the Dock.
Apps sold in the Mac App Store have no permission to touch any of the daemon, agent, or login item settings. This is monitored by Apple and additionally enforced by technical means built into macOS. However, if a feature of such an App needs to control whether the App or parts of it should launch automatically after the user has logged in, it first has to ask the user for explicit permission (e.g. by changing a preference setting within that App), and then has to send a specific request to macOS to register the auto-starting component. If the request is OK, macOS will store the auto-start wish in an internal database, hidden from the user, only visible to the App that requested it. TinkerTool System uses the term Service Login Item to refer to such special configuration entries for Apps.
If macOS or the managing application modifies the configuration of a service login item for a user account, the change will not become visible in TinkerTool System until this user logs out.
For each job that is currently configured to launch automatically, TinkerTool System shows the following entries:
- a sequence number, which makes it easy to count all entries and to refer to them,
- the current status of the job when the report was created,
- the identification name macOS uses internally to manage the configuration entry,
- the date the automatically starting program has been modified the last time.
The different status entries, which are shown with color markings and between square brackets, have the following meaning:
- user-controlled: this entry has been created by the user. The user also controls when to quit the auto-started component.
- canceled: the operating system auto-launched the job, but stopped the running process later, because the computer experienced very high memory pressure due to lack of RAM, and the affected job is not absolutely necessary for the computer’s operation. When this happens, the system may run slower than normal, and some features may be limited. It is recommended to use the function Diagnostics > Evaluate RAM size of TinkerTool System to find out whether you should purchase more RAM to let your computer cope better with your typical workload.
- failed: the operating system auto-launch the job, but the associated program stopped with an error code. There appears to have been a technical problem which caused the job to fail.
- running: the job was started automatically and is currently running.
- ready: the job is correctly configured to start automatically, but is currently not running. This is normal for jobs that only run it certain situations, at specific times, when specific events occur, when specific hardware devices are connected, etc.
- switched off: the job is generally preconfigured to be started automatically, but a setting in the operating system explicitly deactivates this job. This is normal for services that should only run in specific cases, for example after certain features have been switched on.
- inactive: the job has a configuration entry for automatic start, but the operating system has rejected to register this entry for some reason. This is usually uncritical and the exact reason has not been determined by TinkerTool System.
- finished (single run): the job is configured to be started automatically, but it fulfills a certain task which needs to be done only once at startup, so the process can quit as soon as its work has been completed. Everything was executed correctly and the job is no longer running at the moment.
- invalid (no executable): the job is configured for automatic start, but could not run because the associated program is missing. TinkerTool System has determined that this configuration entry is invalid. In most cases, such a problem is caused by deleting an application without uninstalling it correctly.
Unfortunately, it has become a habit that Apple ships the operating system with some incorrect configuration entries. If TinkerTool System detects a job with abnormal status which relates to one of these known issues (which are usually uncritical), it will indicate this by the additional message line Note: This is a known defect of the running operating system and thus “normal”.
Removing invalid auto-start entries
TinkerTool System can automatically remove invalid entries for automatically starting jobs in cases where its analysis has confirmed that it will be absolutely safe to do so. If one or more of such entries have been found, the additional button Resolve problems… will become visible at the bottom of the window. These are usually cases where an outdated entry had been left on the system because its associated application had been deleted without correctly uninstalling it first.
After clicking the button Resolve problems…, TinkerTool System will show a table with all invalid entries that can be safely removed. When clicking on lines in the table, detail information will be shown. Click either the button Clean selected entry to fix a problem with the job currently selected, or the button Clean all entries for all entries currently shown in the table.
When cleaning invalid entries of type service login item, special conditions apply: Apple has specifically designed these entries in a way to ensure that they should only be accessible by the Apps that created them. It is possible for TinkerTool System to override this protection, but this is not recommended and should only be used as a last resort. To remove a bad entry for a service login item, it is recommended to re-install the App shown as “managed by…” at the entry in the job overview report, and then to use the preference settings within that App to disable its autostart features.
If invalid entries of type service login item are in the list, TinkerTool System will ask you whether they should be considered during the clean-up procedure or not.
To remove invalid login items, use the respective feature of the pane User.
NVRAM
This feature is only available for Macs with Apple Silicon processors. It is not necessary on Intel-based Macs.
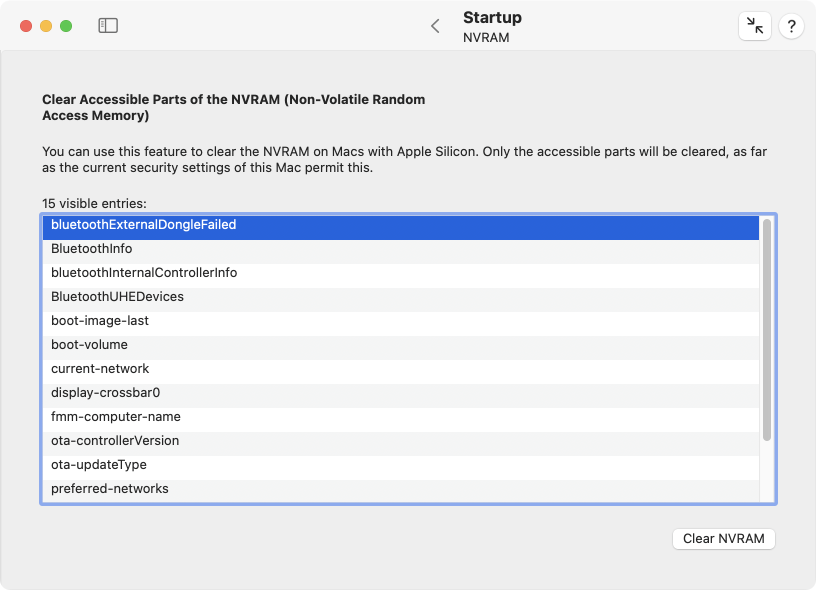
The NVRAM (Non-Volatile Random Access Memory) is used on each Mac to store settings permanently that should become effective for the entire computer and all installed operating systems. The part of the memory visible to the user is sometimes also called Parameter RAM (PRAM).
Settings that can be stored in NVRAM include sound volume, display resolution, startup-disk selection, time zone, and information on recent system crashes. The settings stored in NVRAM depend on your Mac and the devices that you are using with your Mac. If you experience issues related to these settings or others, resetting NVRAM might help.

On classic Macs, NVRAM can be reset directly when switching on the computer by holding down a specific key combination. Modern Macs with Apple Silicon no longer have this feature. TinkerTool System can help here, by deleting as many settings from the NVRAM as possible. Which exact settings this will be in a specific case will depend on the current security settings of the Mac, in particular for System Integrity Protection. Perform the following steps to execute the procedure to erase the NVRAM:
- Open the sub-item NVRAM of the pane Startup.
- Click the button Clear NVRAM.
You can review the visible parameter settings of the NVRAM in a table before and after the delete operation.
FileVault
FileVault, more precisely FileVault 2, is the name of Apple’s technology of being able to encrypt the startup volume of a Macintosh, although the operating system is stored at that location together with the user data. At startup, macOS is not yet available, since it is on the encrypted volume at that point in time, so a second login with a second administration of users must be set up, which is only connected to the macOS user administration after its decryption and its launch.
In modern Macintosh model series, the built-in flash memory is always encrypted, even if FileVault is switched off (see also the chapter The pane APFS, section APFS Keys). FileVault only has to take care of the encryption process on older Macs. The actual capability of FileVault is to manage a user login before macOS even starts, hereby granting access to the keys needed for decryption. FileVault can therefore be viewed as an upstream mini operating system that controls which users can decrypt and start the actual operating system.
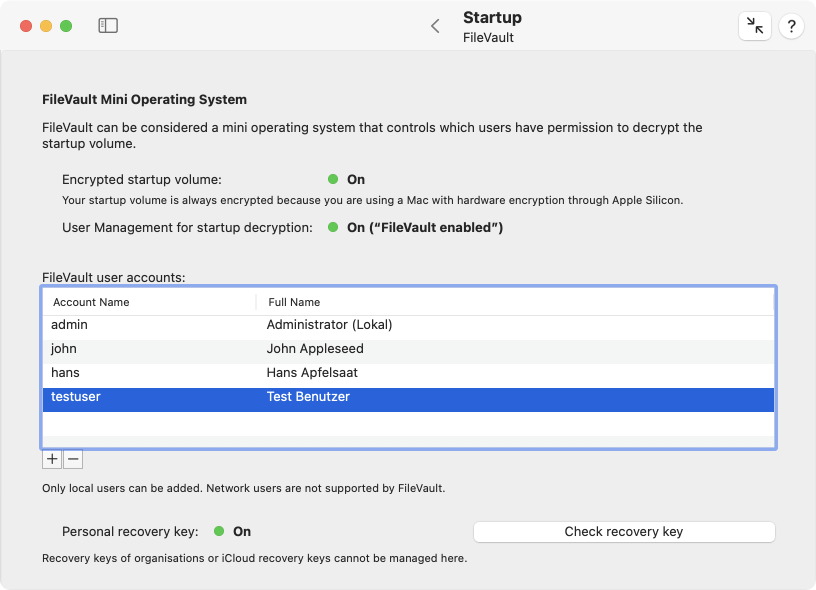
TinkerTool System indicates these two aspects separately in the upper half of the window of the FileVault feature:
- Encrypted startup volume: indicates whether the volume group containing the running macOS and user data is encrypted
- User management for startup decryption: specifies whether FileVault login precedes the startup of macOS

Access to FileVault data in the lower half of the window is protected by macOS and only becomes active after an administrator has enabled it by clicking Fetch user list. It is also necessary that FileVault is enabled.
The table FileVault User Accounts lists all macOS users that should be included in the FileVault login. The item Personal recovery key indicates whether a special key was stored when FileVault was enabled, which allows the start volume to be decrypted by entering a text code in case of an emergency, even if all registered user accounts are failing.
A personal recovery key is a readable code based on the pattern
ABCD-EFGH-IJKL-MNOP-QRST-UVWX
which can be archived permanently in a text file or on paper for emergencies. Alternatively, the recovery key can also be stored in Apple’s iCloud. In this case, however, it will be bound to an Apple Account.
Another alternative especially for large organizations is to create a master key for FileVault that fits all Macs, instead of maintaining a separate key for each individual device.
Such institutional keys or iCloud keys are not shown by TinkerTool System.
Managing FileVault users
As mentioned, FileVault user management must be separate from macOS user management for technical reasons. You can add or delete accounts to FileVault with the two buttons + and — below the user table.
To delete users from FileVault, select one or more of the affected rows in the table and click —.
To add users to FileVault, several prerequisites must be met:
- You need to know which user account is currently considered the primary FileVault account. This is usually the account that initially set up FileVault and is shown at the top of the table. However, this could have changed later when user accounts have been erased.
- You need to know the macOS password for the primary FileVault account.
- You must also know the macOS passwords for any user accounts that you subsequently add to FileVault.
If the prerequisites are met, perform the following steps:
- Press the + button below the user table.
- From the list of local macOS users, select the ones that should be added to FileVault and click Continue.
- Enter the name and password of the primary FileVault account and click Continue.
- Enter the appropriate password for each user that will be added and click Continue.
If adding users was successful, the results will be shown in the table.
The FileVault mini operating system is not capable of working with directory servers. Therefore, only local users of this Mac can be added, not network accounts.
Checking a personal recovery key
If you use multiple Macs or have managed multiple Macs over the years, you may have kept a lot of notes about personal FileVault recovery keys. In practice, uncertainties can easily arise here as to whether an archived key actually fits a specific Mac. This can be checked quickly with TinkerTool System:
- Click Check recovery key.
- Enter the text code of the key when the program asks for it.
You will then be informed whether the key fits this Mac or not. As mentioned, institutional master keys or iCloud keys cannot be validated this way.