File Operations
The Pane Files
Link
A file system link is an additional representation of an existing file, or —in some cases— a folder. It can be used to refer to the file at a different location, in another folder or on another disk drive, or by using a different name. macOS is supporting three different types of links:
- Alias: an object referring to another file or folder which is capable of tracking the original object in case it should move or has been renamed. An alias becomes invalid when the original object is deleted.
- Symbolic Link: an object referring to another file or folder via its UNIX path name. If the original object is moved or renamed, the link will intentionally break. When trying to open an object via a broken link, you will receive an error message.
- Hard Link: an additional entry in a folder which is referring to a file. Neither the user nor the operating system can distinguish a hard link from the “first” folder entry of a file, so we can no longer speak of an original object here. Hard links are just one or more additional names pointing to the same file. Hard links are restricted to files, they cannot be used for folders. They also cannot cross volume boundaries, so the file a hard link refers to must lie on the same disk volume as the link.
The macOS Finder can create aliases only. If the Finder displays a symbolic link, it will also represent it as alias to simplify the situation for unexperienced users. Such objects are shown with a black curved arrow in addition to their icons. Aliases are a technology taken over from the classic Mac OS, and in some specific cases, applications must explicitly support the alias technology in order to access the original item the alias is pointing to. Links however are evaluated by the operating system itself, so they should work with any application.
In fact, modern versions of macOS internally differentiate between classic Mac OS aliases, which are now deprecated, and modern aliases based on so-called bookmarks.
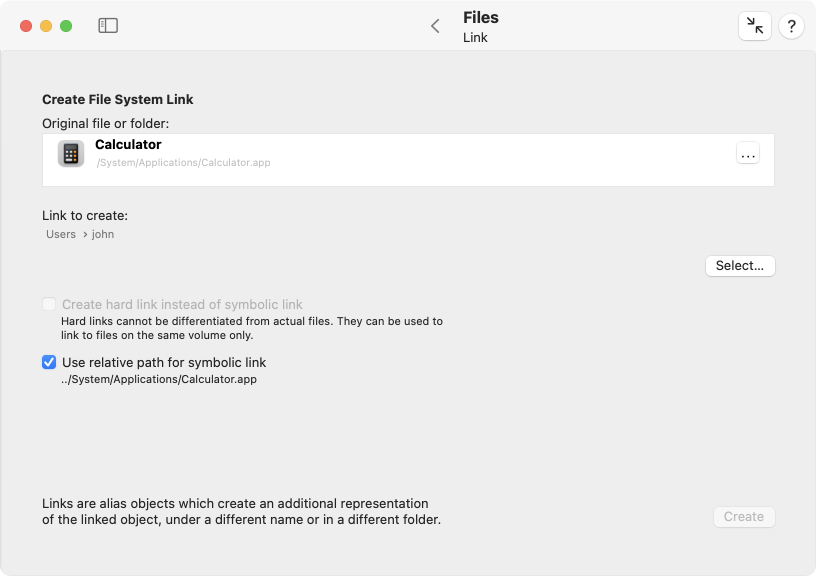
Because the Finder cannot create symbolic links or hard links, TinkerTool System adds these missing functions. Perform the following steps to create links:
- Open the sub-item Link on the pane Files.
- Drag the original file or folder from the Finder into the field Original file or folder. You can also click the button […] to navigate to the object, or click on the white area to enter the UNIX path of the object.
- Click the button Select… to specify the location and name where you like the link to be created.
- By default, a symbolic link will be created. If you like to create a hard link, check the option Create hard link instead of symbolic link. Remember that hard links are restricted to point to files on the same disk volume.
- If you have chosen a symbolic link, decide whether to create it with an absolute or relative path, using the option Use relative path for symbolic link. A relative path won’t break in cases when you later move an entire folder hierarchy to another location, and both the link and link destination are within that hierarchy. The relative path that will be used is shown below the option.
- Click the button Create.
Protection
macOS supports a special protection attribute which can be attached to files or folders. When you mark an object as being protected, it is no longer possible to change or delete it. Any change requires that the protection is being removed first. The macOS Finder uses a lock symbol displayed in addition to the usual icon to represent a protected object. Sometimes, the terms “locked” and “unlocked” are used for protected and unprotected objects, respectively. However, locking can also mean a different thing, namely to mark an object as being in exclusive use by a program, so we don’t use this term to avoid confusion.
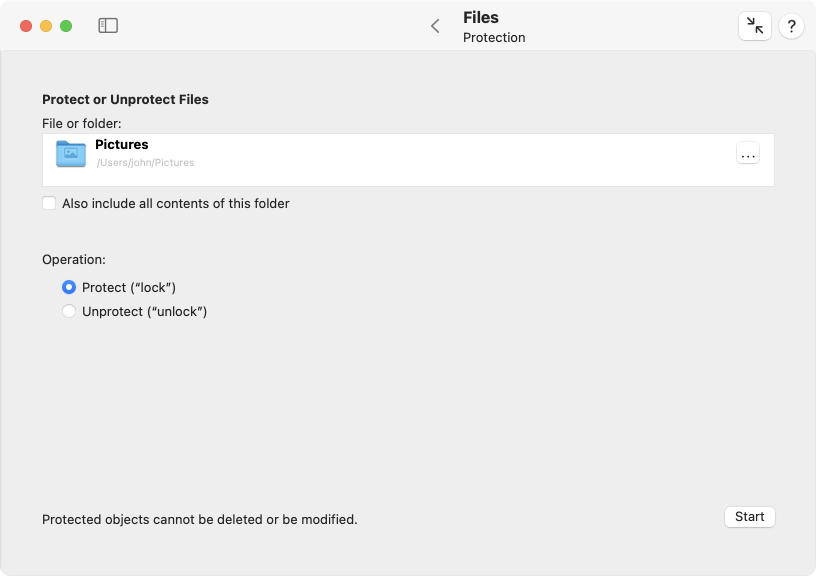
TinkerTool System has the option to set or remove protection flags not only for single objects but for a whole hierarchy of files and folders included in a top folder. To work with protection attributes, perform the following steps:
- Open the sub-item Protection on the pane Files.
- Drag a file or folder from the Finder into the field File or folder. You can also click the button […] to navigate to the object, or click on the white area to enter the UNIX path of the object.
- If you have selected a folder, decide if the protection should only be modified for the folder itself or all its contents, too. Set the option Also include all contents of this folder accordingly.
- Switch the radio buttons Operation either to Protect or Unprotect.
- Click the button Start.
Some non-Macintosh file systems are not capable of supporting protection attributes. In this case, the operating system may confirm that the protection marker has been set successfully, but the object remains in the unprotected state.
Attributes
In addition to the protection marker, which is also supported at the UNIX level of macOS, the operating system is supporting some high-level attributes which have been adopted from the classic Mac OS.
- A file can be associated with an HFS type code: The type code is designed to indicate what kind of document the file should represent. By help of the type code, the system can quickly determine what is expected to be stored in a given file, without needing any special markers in the file name (like file name extensions) and without having to analyze the contents of a file.
- A file can also be associated with an HFS creator code: The creator code was designed to indicate which application should open this file. By help of the creator code, the system could quickly determine which application the user prefers to open a given document, hereby overriding the default connection between the file type and the associated standard program to open documents of this type. Creator codes enforced a strict binding between a specific document and an application. Today, creator codes are a thing of the past. TinkerTool System can still show and edit creator codes, but they are no longer in use in macOS.
- Files or folders can be associated with a visibility marker: If an object is marked as being invisible, the Finder and all Open panels will no longer display this object. You can only refer to the file by specifying its full UNIX path name, or by using applications which do not respect the visibility attribute. Invisible objects are also called hidden.
Although we are referring to type and creator attributes as being HFS codes, these codes are not restricted to be used on HFS and HFS+ file systems only. macOS is capable of emulating these attributes on nearly any file system.
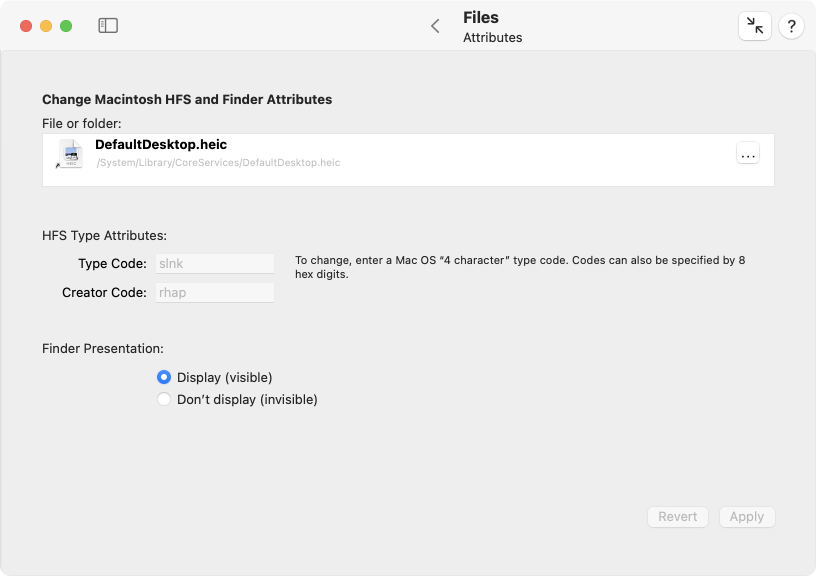
To change one or all of these high-level attributes, perform the following steps:
- Open the sub-item Attributes on the pane Files.
- Drag a file or folder from the Finder into the field File or folder. You can also click the button […] to navigate to the object, or click on the white area to enter the UNIX path of the object.
- Modify the attributes, entering new values into the code fields, or clicking one of the Finder Presentation buttons.
- Click the button Apply to set the new attributes, or click the button Revert to discard your changes and reread the current attributes from the selected object.
Type codes and creator codes must be specified either by four characters of the ASCII character set, or by four arbitrary bytes which have to be entered using eight hexadecimal digits (the digits 0 to 9 and the letters a, b, c, d, e, f, or A, B, C, D, E, F). The program will automatically detect what you mean depending on the length of your input. Note that codes specified by ASCII are always case-sensitive. Examples for valid codes are:
- PREF
- ilge
- 8BPS
- A4B7C1D1
To remove a type or creator code from a file, delete the entry in the respective code field completely and click Apply. TinkerTool System cannot assist you in selecting type or creator codes for known document types or known applications, respectively. You’ll have to know the correct codes in advance.
Although it is technically possible to store HFS type attributes for folders, the meaning of this was undefined in the classic Mac OS, and Apple never supported this officially. For this reason, TinkerTool System also won’t permit to attach these attributes to folders.
Keep in mind that you can no longer use drag-and-drop or file dialogs for objects which are invisible. You’ll have to enter the object’s full UNIX path to access it by an application. This also includes TinkerTool System. However, you can press the key combination ⌘ + ⇧ + . in a Finder window to let it show invisible objects. Pressing the key combination in the Finder once more will disable that feature again.
Changing Time Attributes
Among the many attributes stored with each file and each folder are various time specifications:
- Time of creation
- Time of last modification
- Time of last access
- Time of last backup
- Time of last status change
The times of last change and last access are mandatory. Whether other times are also saved depends on the respective file system. For example, HFS+ is able to store the time of last backup while APFS cannot. Information that is not available is marked by TinkerTool System with greyed-out labels.
macOS and other UNIX systems use the date 01/01/1970 to indicate that a valid time has not been set yet.
There can be various reasons for adjusting or correcting the time information manually, for example if a file contains a digital image from a camera with an incorrect clock setting. TinkerTool System allows the existing time information to be overwritten with other values.
The time of last status change plays a special role in the operating system and is usually not displayed by applications such as the Finder. This time specification is used, among other things, to control the internal administration of the file system and cannot be changed in order to avoid errors in the system.
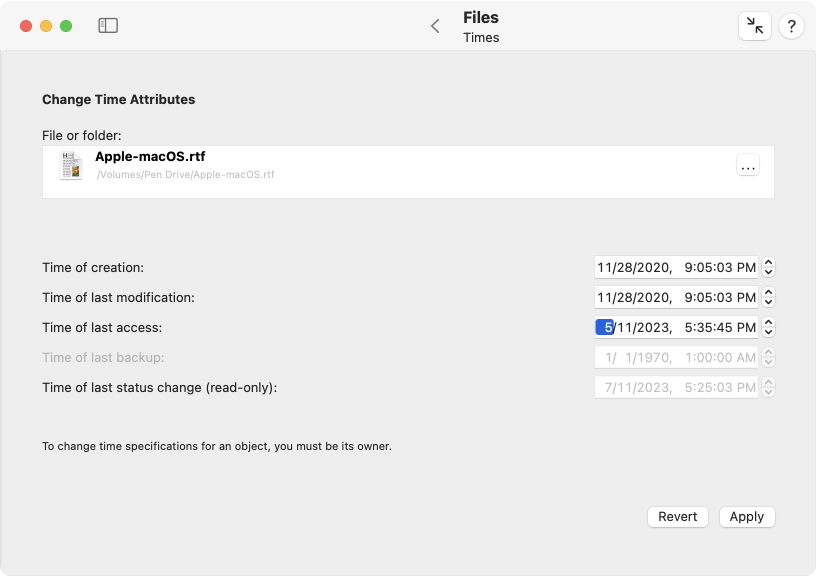
To modify one or more time attributes of an object, perform the following steps:
- Open the sub-item Times on the pane Files.
- Drag a file or folder from the Finder into the field File or folder. You can also click the button […] to navigate to the object, or click on the white area to enter the UNIX path of the object.
- Change the time specifications as desired by entering new values into the fields, or by clicking their arrow buttons, respectively.
- Click Apply.
You can use the button Revert any time to go back to the original values currently stored.
Caused by activities of the operating system, the value for time of last access may unexpectedly change after TinkerTool System has saved it. This is mainly due to how the Finder’s preview functions work and cannot be prevented.
The Finder additionally shows a time Last opened. This is not an attribute actually stored in the file system, but a value calculated by Spotlight. Therefore it is not included in the list of times.
Quarantine
An important part of the security infrastructure built into macOS is its capability to track potentially dangerous files coming from untrusted sources, or having been transferred via unsafe channels like the Internet. When you open such a file or program, you will receive a warning message which asks for reconfirmation whether you actually trust the file. The source of the file and the time when it was loaded onto your computer is noted in the message.
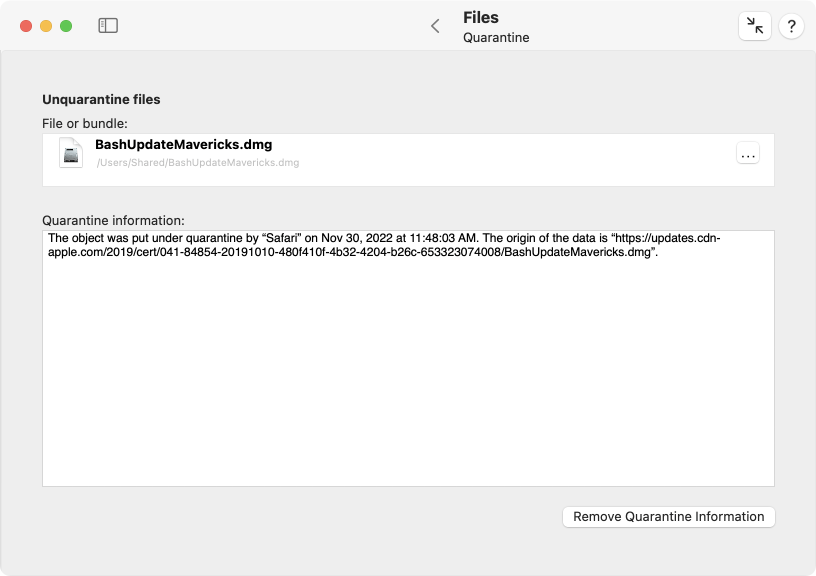
This feature is technically implemented by adding special quarantine attributes to the affected files. TinkerTool System can display this information, giving you the option to remove the attribute, hereby “un-quarantining” the files. This can be helpful if you know that the file comes from a trusted source and you like to “re-publish” it on your own computer, for example before placing it into the public folder /Users/Shared or before uploading it to your local file server. This way you can avoid that other users are confronted with the warning message. They might not be able to successfully confirm they trust the files because they might not have the necessary write permissions for the shared folder.
Removing quarantine information from an application will also disable the security feature “Gatekeeper” for that program. macOS will no longer recognize that the application has been downloaded from the Internet, so its files will become irrelevant to Gatekeeper.
To remove quarantine information from a single object, perform the following steps:
- Open the sub-item Quarantine on the pane Files.
- Drag a file or bundle from the Finder into the field File or bundle. You can also click the button […] to navigate to the object, or click on the white area to enter the UNIX path of the object.
- Verify the current status displayed in the field Quarantine information.
- Click the button Remove Quarantine Information.
Contents
You may sometimes receive files of unknown origin or with unknown document types. In other cases, files may have invalid type markers or file name extensions, for example a file displayed by the Finder to be a PNG image although it actually contains a JPEG image. To find out what is really contained in a file, you can have macOS look into the file letting it analyze what its contents may be. To do this, perform the following steps:
- Open the sub-item Contents on the pane Files.
- Drag a file from the Finder into the field File to analyze. You can also click the button […] to navigate to the object, or click on the white area to enter the UNIX path of the object.
- The result of the analysis will be displayed in the field Results.
The analysis is done by the underlying operating system, not by TinkerTool System. For this reason the results may slightly vary in different operating system versions. The report is always displayed in English, no matter what preferred language you have set in your personal preferences.
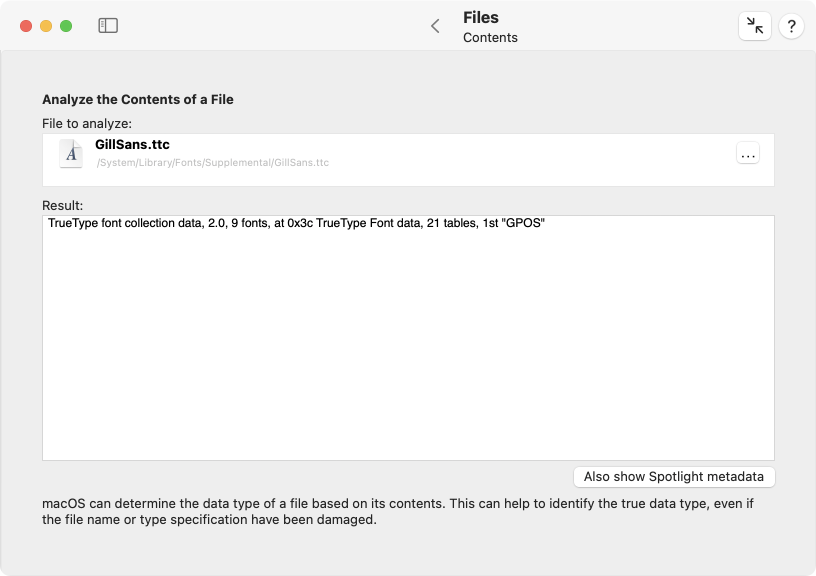
You can only select one file at a time. It is not possible to analyze applications or other bundles. They will be simply identified as being a directory, the technical term for a folder. This analysis is correct, because bundles are actually folders which may contain a large number of different files although the Finder represents them by single file icons. To select one of the files inside a bundle, select it in the Finder and use the Finder’s feature Show package contents to open it as a folder. Then drag one of the contained files into the field of TinkerTool System.
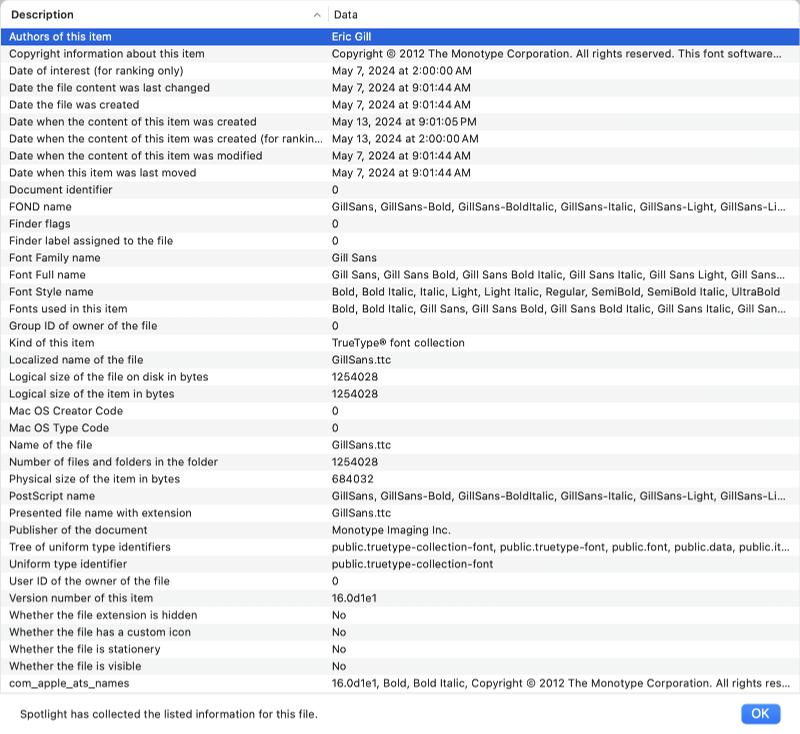
In some cases, it might also be helpful to know which metadata the Spotlight search engine of macOS has collected about a particular object. To additionally display the Spotlight data, click the button Also show Spotlight metadata below the Results field. A table will appear which contains the complete list of Spotlight attributes for the selected object.
Analyze Alias Objects
In 1991, Apple introduced a new file system object, the alias, in what was then the operating system Mac OS 7. Via the menu item Make Alias you can create a reference to an existing file or folder and thus address the same object under different names or at different locations, without having to store it multiple times. In other operating systems, aliases are also known as shortcuts or links.
Aliases still exist in today’s macOS. However, they are technically implemented differently, since the original way of storing aliases is too insecure by today’s standards and has certain disadvantages. Since the base of the operating system has been switched to the professional UNIX, other types of alias-like objects have also been added, since file references have existed in UNIX for much longer. All of these different ways of linking files are presented as alias by the Finder for convenience, although there are often subtle differences in their properties and capabilities. TinkerTool System allows you to determine how an alias is actually implemented. You can also check which target object the alias refers to and how much storage space it requires.
macOS currently uses the following types of alias objects:
- Classic Mac OS Alias: This was the original file type to store aliases. It was a special description file in which a kind of search specification for the target object was stored. In addition to name and storage folder, things such as the approximate file size and files in the neighborhood were also specified. If a program wanted to open an alias object, it had to take special steps itself, namely passing the object to the Mac OS Alias Manager for evaluation. This sent a kind of search request to the operating system to find the original file using the existing description data. This way, an alias could often remain functional even if the original file was renamed or moved. This was quite convenient, but had the disadvantage that every program had to actively support working with aliases. In addition, by today’s standards, the idea of finding the original using a search request in case of doubt is too dangerous: an attacker could replace an original file with a fake that is so similar to the original that the Alias Manager uses the manipulated copy instead of the original as the target of the alias. This could make users open a file that triggers malicious functions with their current rights. Modern versions of macOS no longer create such classic aliases. However, for compatibility reasons, these aliases can still be opened, but they are subject to special security restrictions.
- macOS Bookmark: If you create an alias via the Finder, recent versions of macOS save the alias as a macOS Bookmark file. This behaves similarly to a bookmark in a web browser and saves the target via a file-related URL (“Internet address”), which can also be protected with security information. For security reasons, if you move the original object to a different location, the reference is intentionally invalidated and the alias can no longer be resolved. When working with files and folders via the usual macOS Open dialog windows, the evaluation of bookmarks is supported automatically by the higher layers of macOS, so that applications don’t have to take care of it.
- absolute symbolic link: on the UNIX level of macOS, aliases can be implemented even more simply: you store the absolute file path of the target in a text file and add a marker that it is a link, in this case a symbolic link. Working with and creating symbolic links has already been described in the first section of this chapter. Here, the link will also become invalid by intention when the original object is renamed or moved. Symbolic links are resolved fully automatically by the operating system, without the opening application having to “know” this. Only if a program actively states that it explicitly does not want to have symbolic links evaluated, it will be able to recognize a symbolic link as such.
- relative symbolic link: This is a special variant of a symbolic link, where the file path is not saved as an absolute location, but relative to the location of the alias (e.g. as “go up one folder, then go to object X in subfolder Y”). In this case, an entire subfolder hierarchy can be moved to a new location and the link will still be valid.
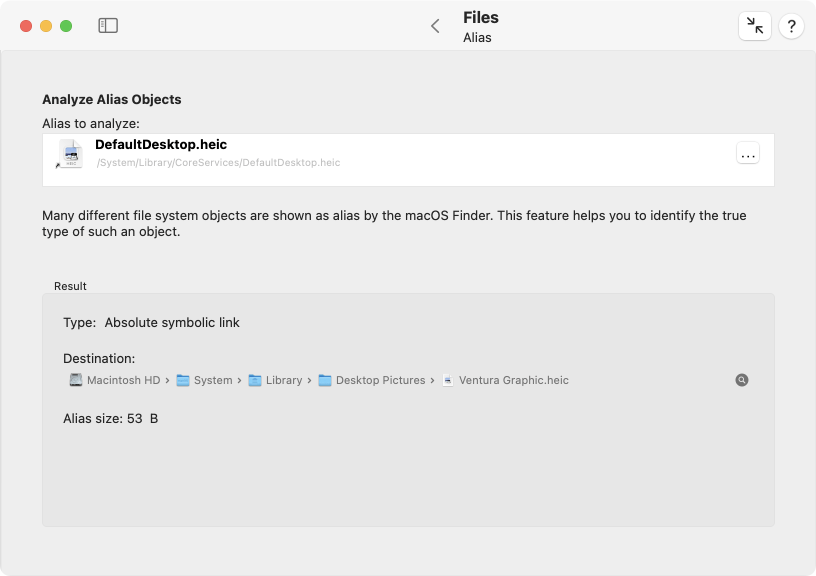
To determine the actual type of an item presented as alias by the Finder, do the following:
- Open the sub-item Alias on the pane Files.
- Drag an alias from the Finder into the field Alias to analyze. You can also click the button […] to navigate to the object, or click on the white area to enter the UNIX path of the object.
The evaluation is shown in the Result box. You can use the magnifying glass icon to reveal the original object in the Finder.
Force Delete
Badly written applications and installers which don’t handle permissions properly may leave files or folders on your system that cannot be moved into the Trash very easily. In other cases, applications may create a large number of files with write protection which also cannot be removed quickly. If you want to enforce removal of a large number of protected files, or if you want to remove a file from a folder with inappropriate permission settings, you can do so with the Force Delete feature:
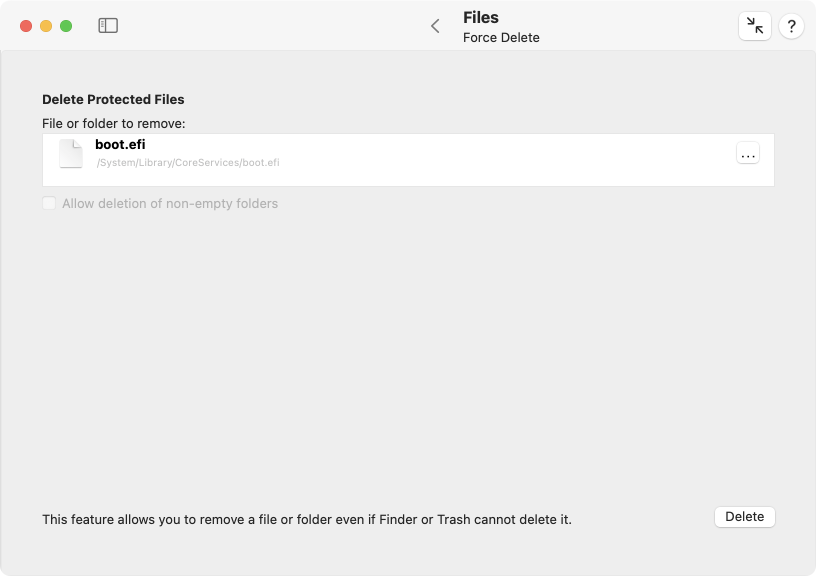
- Open the sub-item Force Delete on the pane Files.
- Drag a file or folder from the Finder into the field File or folder to remove. You can also click the button […] to navigate to the object, or click on the white area to enter the UNIX path of the object.
- If you have selected a folder for removal and this folder contains objects, you must confirm that you are going to delete the folder together with its objects inside. In that case, set the check mark Allow deletion of non-empty folders.
- Click the button Delete.
Nesting
Limits of the Local Operating System
Modern operating systems and file systems have no limit how deep you can nest folders. However, there is a technical limit in the paths that are used to refer to these folders or the files they contain. In compliance with the POSIX industry standard, an operating system does not need to support file access paths with unlimited lengths when addressing a file system object in an application, command, or any function that works with file names.
In practice, this means that access to a file in a hierarchy of very deeply nested folders with long names may just fail, when the operating system does not accept that file’s absolute path because it is too long. Objects in such folders may become invisible on the graphical user interface, e.g. in the Finder, or in Open/Save panels, because the system is no longer capable of processing their oversized paths.
Note that paths depend on context and present situation. If a file is on your system volume named “Macintosh HD,” it may have an absolute access path like
/Users/MyName/Documents/Some/Nested/Folder/Example/Document.txt
If this disk is now mounted as external drive by a different Mac, the very same file may now be addressed by
/Volumes/Macintosh HD/Users/MyName/Documents/Some/Nested/Folder/Example/Document.txt
so the length of the path has increased by the part needed for “/Volumes/Macintosh HD” that the other Mac uses to refer to this external disk volume. Paths for identical objects can vary depending on how you combine multiple disks to build the entire file system hierarchy of the running computer. In enterprise networks, objects on file servers can become visible in arbitrary folders the network administrator has chosen for the client computers to use. In this case the paths are also just appended at run time. They are not stored anywhere.
Such deep folder hierarchies with overly long access names can be created by using relative paths instead of absolute paths. We won’t go into further details here, but the operating system alternatively supports the concept of a current working folder. You can tell the system to “go” into the folder at
/Users/MyName/Documents/
then to navigate to the subfolder Some, then to navigate to its subfolder Nested, and so on, only using relative “navigation” instructions with short paths, instead of packing the entire specification of the file’s location into one single path specifier.
When referring to path lengths, not the plain number of characters, but the amount of memory used to store the characters when handling the path plays the crucial role. All modern operating systems use the Unicode UTF–8 encoding when processing file paths. With this encoding system, Latin characters, including characters with accents for many European languages usually need one byte per character. Characters of many Asian languages are stored as two bytes. Very specialized characters, such as Emojis, need four or even more bytes.
TinkerTool System can determine the maximum number of bytes the currently running version of macOS guarantees to be supported when referring to files via paths. It can also check whether all files in a folder hierarchy of a specified top folder can currently be addressed by absolute paths without exceeding this given limit.
- The check can be performed for any folder, no matter if it is on the system volume, an external disk, or a file server.
- To avoid privacy issues, the check will be limited to files and folders which you are permitted to open.
- The scan is automatically limited to the volume on which the top folder is located. If you like to test all disks, you’ll have to run separate checks, selecting each of their top folders.
- Objects marked as dataless files, which refer to synchronized data in iCloud or cloud solutions of other vendors, are automatically excluded by the operation. Otherwise, macOS would automatically trigger downloads for the affected files when their folders are scanned.
You can activate an additional option not only to check the paths as they currently are, but also to check possible paths that could be created if an application attempts to copy the tested files to a different volume, and that application is using absolute paths to do that. As we had explained previously, the path for the mount point of the destination volume would need to be added to the already existing paths if a program tried to create a “clone” of a volume, copying its contents file by file to a different one.
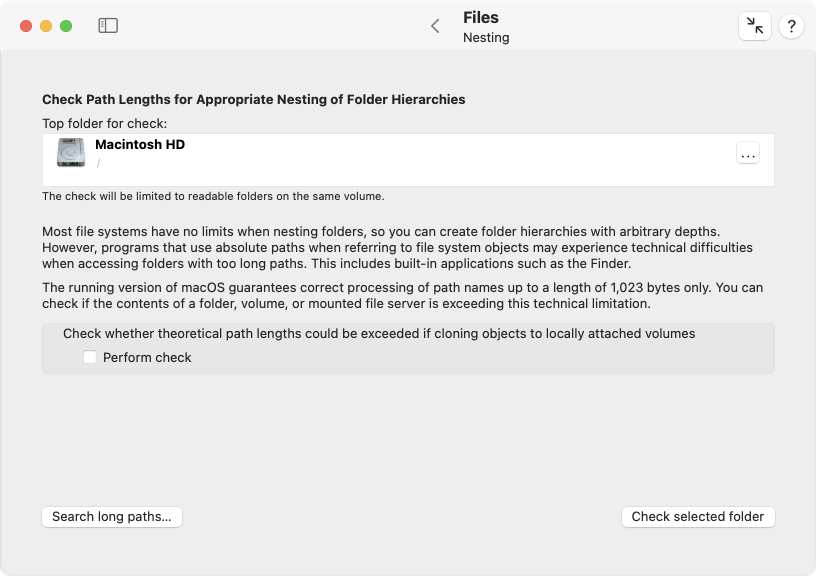
Perform the following steps to check a folder hierarchy for overly long access paths:
- Open the sub-item Nesting on the pane Files.
- Drag the folder where the test should start from the Finder into the field Top folder for check. You can also click the button […] to navigate to the folder, or click on the white area to enter the UNIX path of the folder.
- Decide if you like to check the paths of the selected objects as they are, or to check their paths under the assumption that each object would be copied to all currently attached volumes. In the latter case, set a check mark at Check whether theoretical path lengths could be exceeded if cloning objects to locally attached volumes.
- Click the button Check selected folder.
The scan will begin. It can be canceled any time by clicking the Stop button in the status sheet. After all tests have been completed, the results will be shown in a different panel. If all objects are expected to be accessible, a green check mark symbol is shown. If one or more problems have been detected, the result panel will show
- a list of all files and folders which may not be accessible by all applications, (or cannot be copied to a currently attached local volume, respectively),
- the number of bytes used to store the path of each possibly inaccessible object,
- a reveal button for each object to navigate to the problematic folder in the Finder,
- a separate table that lists all folders that could not be tested due to permission problems.
When using a reveal button, the Finder may not open the indicated file system item, because it is affected by the path problem itself, so it cannot correctly process the location of that item. Instead, TinkerTool System will instruct the Finder to open the “deepest” folder in the hierarchy that can still be safely displayed.
Although the shown folder can still be handled by the Finder, some or all of the folder’s contents may be invisible in the related Finder window, because the Finder is no longer capable of processing the items’ names at that deep level of the hierarchy. If you delete the supposedly empty folder, you may lose data!
You should rename the folder at this or a higher level, giving it a shorter name to resolve the problem. You could also move the affected folder to a higher position in the hierarchy instead. It would not be appropriate to do this automatically, so TinkerTool System won’t assist you further in this matter. The reorganization of folders should be done by the owner of the files who created the nested hierarchy.
Arbitrary Limits for Other Systems
In some cases, the question how long a file system path can be in order to be processed correctly may not affect the local system, but the collaboration with other systems. For example, you may have set up a folder which should be automatically synchronized with a remote folder via network, but that network server uses different limits for acceptable path lengths.
In addition to the detailed local checks, TinkerTool System also offers a simple quick check that tests a selected folder hierarchy against a path limit you can specify yourself. Perform the following steps to do this:
- Open the sub-item Nesting on the pane Files.
- Drag the folder where the test should start from the Finder into the field Top folder for check. You can also click the button […] to navigate to the folder, or click on the white area to enter the UNIX path of the folder.
- Click the button Search long paths….
- Specify whether you like to validate absolute paths (as they currently are on the volume of the local computer), or relative paths (as seen from the selected top folder) and specify the limit in bytes. Click OK.
TinkerTool System now checks the folder and all its subfolders on the same volume where you have read permission, and collects all file system objects in a list that indicates where the specified path length is exceeded. The results are displayed at the end of the search procedure, listing paths and their respective lengths. After selecting a line, the corresponding path will be shown with its complete length, and you can also open it in the Finder, as far as technically possible.
The minimum limit you can specify is 200 bytes, the maximum is the local limit of the running operating system.
Extended Attributes
Many of the additions to files already mentioned in this chapter, like HFS attributes or quarantine markers, constitute records of additional information, attached to a file or folder. Several other elements can be attached in such a manner as well, like Finder tags, Spotlight comments, backup markers of Time Machine and many other things. All modern versions of macOS collect such additional records as so-called Extended Attributes. Each Extended Attribute has a certain name, defined freely by the application which created and uses this attribute. Connected with each name is a certain sequence of bytes, representing the value or contents of the attribute. What exactly is stored as contents is at the discretion of the respective program. The number of Extended Attributes which can be attached to a file system object is theoretically unlimited.
Older versions of macOS or the classic Mac OS have used a similar concept known as named forks of a file. In particular, the so-called resource fork played the most important role. The advantage of using Extended Attributes or forks is that additional information can be stored together with the actual contents of a file (usually called data fork), using a single icon and single name for administration and transport. A disadvantage is that not all file systems (e.g. the FAT format of MS-DOS) are capable of storing such attributes. If a file, which has many attributes attached, is copied onto a disk not prepared for such operations, the additional streams of data can simply be lost. It also becomes more difficult to specify the true amount of storage space needed for a file, compared to the simple case.
Modern versions of macOS handle a resource fork internally as Extended Attribute with the name com.apple.ResourceFork.
There can be many different reasons to remove Extended Attributes from files. Here two typical examples:
- You have received a large amount of image files originally created with the classic Mac OS. The files contain resource forks which contain file icons, each representing a preview thumbnail image for the corresponding picture. These resources unnecessarily need a lot of storage space. Today’s computers with multi-core processors are so fast that they can compute the previews for the Finder directly from the image contents, on the fly and in parallel while listing the files. Preview thumbnails computed in advance are no longer needed. In this case you could remove all Extended Attributes named com.apple.ResourceFork from the whole folder of pictures.
- In some case of emergency you have restored files from a Time Machine backup, by copying files directly on the command-line from the Time Machine disk to the system disk, without using the Finder or the Time Machine user interface. In this case, the internal processing markers, used by Time Machine to control which versions of files are available for which points in time, may have mistakenly got on the system disk as well. In order to avoid conflicts with future backups, you like to remove these marker attributes from the restored files, by deleting all Extended Attributes prefixed with com.apple.TimeMachine.
You can specify a single file or a whole folder of files in TinkerTool System to let the program display all Extended Attributes associated with the objects. Afterwards, you can choose to remove one or all attributes with a certain name from the set of file system objects. Please note that read permission is needed for the affected folder and Extended Attributes. For the delete operation, write permission is needed, respectively.
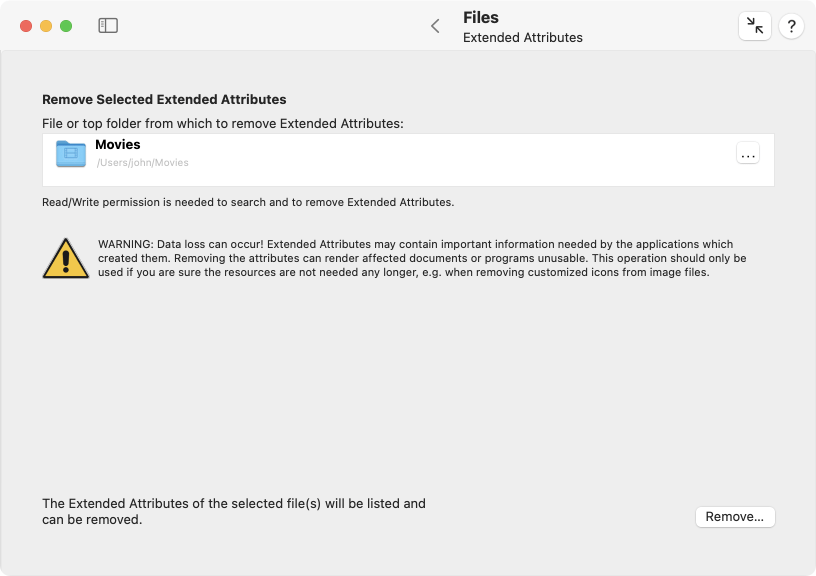
Perform the following steps to display Extended Attributes, or to delete them, respectively:
- Open the sub-item Extended Attributes on the pane Files.
- Drag a file or folder from the Finder into the field File or top folder from which to remove Extended Attributes. You can also click the button […] to navigate to the object, or click on the white area to enter the UNIX path of the object.
- Click the button Remove… to review the Extended Attributes of the selected objects.
Before any attribute is actually going to be deleted, TinkerTool System uses a dialog sheet where all found attributes and the file system objects they belong to will be listed:
- The upper part of the window is listing the names of all found attributes and the number of objects (files or folders) that have this attribute attached. By removing or setting a check mark in the column Remove?, you can define whether this attribute should be removed or not.
- After selecting an attribute in the upper half of the window, the lower half will be listing all paths of the objects containing such an attribute. If you like to restrict the operation to single files, you’ll have to drag each object one by one into the field File or top folder from which to remove Extended Attributes.
The removal operation will start after clicking the button Delete in the sheet. No object will be touched if you click the Cancel button instead.
You should only use this feature if you know exactly what you are doing, in particular, which attributes are needed for what purpose. Specific documents may no longer open after their attributes have been removed.