The Pane Issues
Resolving Issues with the macOS Software Update Feature
Under specific circumstances, which depend on your local network, your Internet service provider, and the country you are in, the software update feature of macOS might not always work as error-free as expected. TinkerTool System can help you to resolve two typical problems with single mouse-clicks.
What is macOS Software Update?
macOS uses two completely separate technical features to keep software products up-to-date: The operating system itself and additional components which can be seen as parts or add-ons of the operating system are updated via a function called macOS Software Update. It is based on a newsfeed-like architecture which informs macOS about available downloads. If you participate in one of the beta software programs offered by Apple, the standard feed can be redirected to a different one which contains additional beta products, not available to the general public.
For Apps that have been dowloaded from the Mac App Store, no matter if the Apps have been developed by Apple or by third-party vendors, macOS uses a different mechanism which is linked to the App Store itself. This feature is called App Updates.
App updates are presented in the App Store application, item Updates. On the other hand, macOS software updates are listed in System Preferences, pane Software Update.
Apple distributes new Macintosh operating systems in form of an App which is in fact the installer for that system. So an upgrade of macOS (switching from your current OS to a new generation OS with a different major version number) comes as App from the App Store, while each update of the OS (product care which only changes the minor version number) comes via the Software Update function.
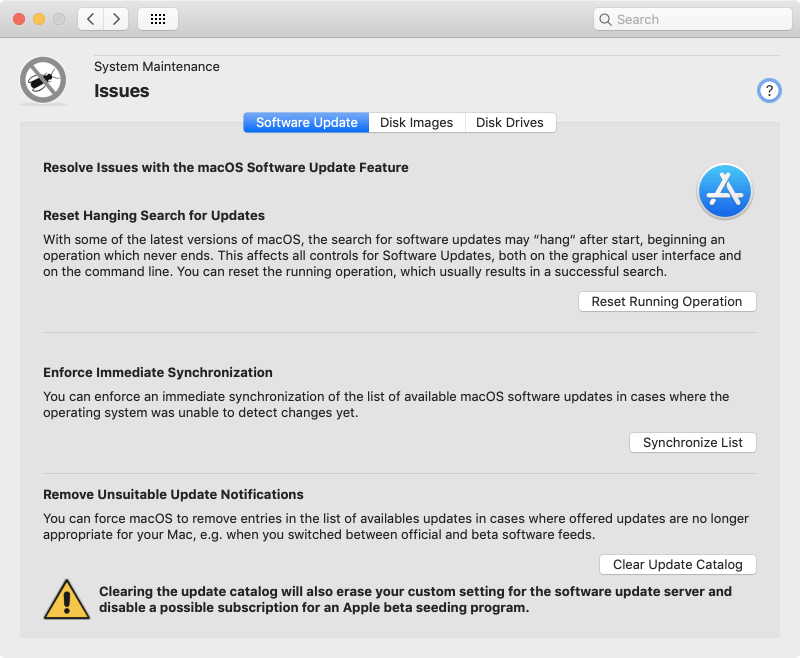
Reset a Hanging Search for Updates
With several of the macOS updates published by Apple in 2022, the software update feature may not always work correctly if you are using an operating system prior to macOS 12 Monterey. When you try to search for the latest updates on the pane Software Update in System Preferences, the progress indicator may begin to rotate endlessly and no actual search is performed. A similar effect occurs when you try to execute the equivalent search command in Terminal. This can be a critical problem, because it blocks the possibility to download important security updates.
TinkerTool System can reset the software update component which will usually resolve this issue immediately. Perform the following steps if your version of macOS is affected by this problem:
- Quit System Preferences or the softwareupdatecommand in Terminal if these programs should be running at the moment.
- In TinkerTool System, open the tab item Software Update on the pane Issues.
- Click the button Reset Running Operation.
If the reset has been successful, you can immediately start a new attempt to search for macOS updates.
Enforcing an Immediate Synchronization with the List of Available Updates
It can happen that macOS doesn’t notice the availability of an update immediately. There can be a delay of up to two weeks before an entry finally appears on your local system. In case you have learned from somewhere else, like a press article or news web site, that an update must be available which was not automatically listed by your computer yet, you can force your Mac to contact Apple, retrieving the latest list of update downloads available now. To do this, perform the following steps:
- Open the tab item Software Update on the pane Issues.
- Click the button Synchronize List.
After that, macOS will contact Apple via your Internet connection. TinkerTool System shows a small status panel, indicating live what the operating system is doing. Retrieving and evaluating the up-to-date software list may take several minutes. If new updates are available, System Preferences will automatically list them as soon as the synchronization process is completed.

Removing Unsuitable Update Notifications
In some special cases, the opposite of the previously mentioned issue can occur: macOS may list available software updates you are no longer interested in, so you basically have “too many” entries in the list of updates. This can happen shortly after you have changed your personal software feed, for example when you have decided to no longer participate in one of the beta programs. In that particular case, System Preferences may still list beta updates although you don’t like to see them any longer.
To clear the list of available updates in such a case, perform the following steps:
- Open the tab item Software Update on the pane Issues.
- Click the button Clear Update Catalog.
Resizing Disk Images
If you have tried to use the feature of Disk Utility to resize disk images in the last years, you may have noticed that it has never been working correctly. After the resize operation, the resulting DMG file usually takes up an absurdly large amount of storage space.
You can use TinkerTool System to perform a correctly working resize operation on macOS disk images. The application supports all standard images, i.e. DMG files that contain a default partition layout with an HFS+ volume at the trailing position containing the payload data of the image file.
We cannot guarantee that unusual variants of disk images, e.g. with multiple data volumes or APFS file systems are supported. Typical HFS+ extensions like journaling, case-sensitivity, or encryption should work, however.
When changing the size of a disk image, you need to enter the new size of the data partition. The possible limits, that depend on the payload in the image and the remaining space on the underlying disk, will be shown to you in advance. The partition table in the image, and the total size of the DMG file will be automatically adapted to the new size. The file will be modified in place without creating a temporary copy, so you won’t need twice the storage space for the payload data.

To resize a disk image with standard layout, perform the following steps:
- Open the tab item Disk Images on the pane Issues.
- Click the button Resize disk image….
- Select the image file you like to resize.
- Enter the new size and click the OK button.
Erasing the Partitioning Info of Disks to Resolve Issues with Disk Utility
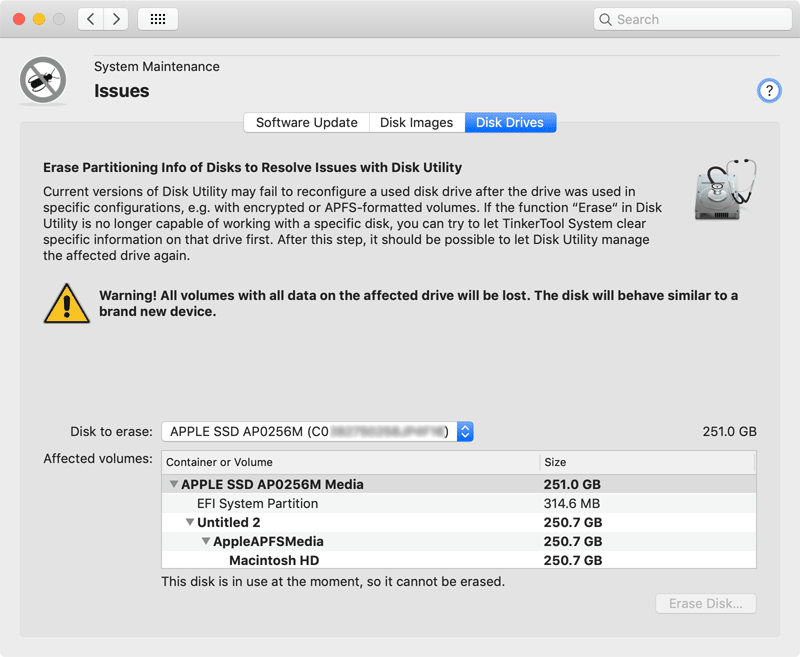
The application Disk Utility, as shipped with modern versions of macOS, is affected by several technical defects. One of the issues can prevent the reorganization of used disks: Depending on the partitioning scheme and previous contents, Disk Utility may reject or fail to erase a disk, so you cannot use the drive for new purposes. All attempts to remove the previous file systems are unsuccessful. TinkerTool System can help in this case, clearing the partitioning info that causes problems in Disk Utility.
Warning: Clearing the partitioning info means that all file systems on the drive in question become inaccessible. All data in all volumes on that disk will be lost. The disk drive will behave similar to a brand new device.
To prepare the disk for successful reuse in Disk Utility, perform the following steps:
- Open the tab item Disk Drives on the pane Issues.
- Select the disk that should be cleared with the pop-up button Disk to erase.
- Review the current partitioning layout of the selected disk in the overview at Affected volumes. TinkerTool System shows the layout in hierarchical order as it was detected by macOS. The application tries to indicate the names and sizes of all volumes found which helps you to identify the correct disk. Note that the overview might include invisible system partitions which might not be shown by Disk Utility.
- Click the button Erase Disk….

Be absolutely sure that you have selected the correct disk for the clear operation before clicking the Erase button.
The disk itself is shown by its device name, often supplemented by a serial number or bus identification, which can help you to differentiate between similar disks if you have multiple drives of the same model. Volumes which are currently not mounted are inaccessible which means that TinkerTool System may not be able to indicate the volume names to which you are accustomed. Instead, the internal names of the associated partitions may be shown. If you are not completely sure about the identity of a specific disk, try to mount it in Disk Utility to see the volume names in TinkerTool System, then unmount the volumes again.
You can only select a drive for erasure when all of its volumes are inactive. If a volume is still in use, eject it in the Finder or in Disk Utility.
After TinkerTool System has successfully performed the clearing procedure, you can try to reuse the drive with Disk Utility, using its own Erase feature which should work correctly now.