Working with the application
Usage Information
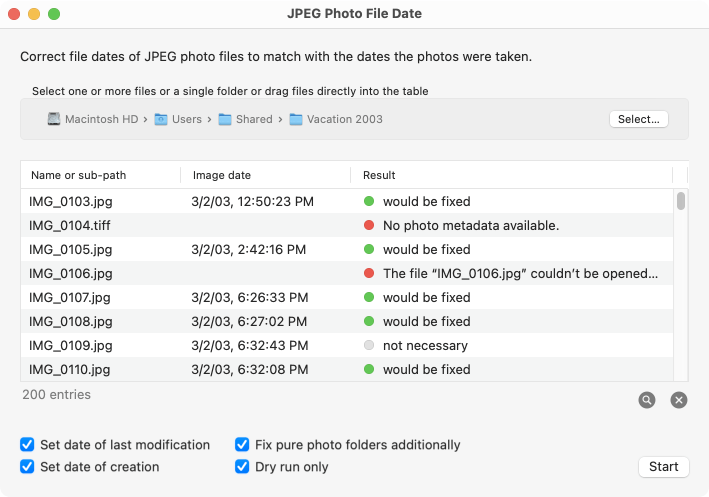
JPEG Photo File Date is easy to use. All functions can be controlled from a single window. To reset the time specifications of a JPEG photo file to the capture time when the photo was taken, do the following:
- Use the controls at the top of the window to select the files to process.
- Use the controls in the lower part of the window to define which corrections should be made in detail.
- Click Start on the bottom right. The requested processing will be carried out. The results appear in the table in the middle of the window.
The following sections describe each of these three steps in detail.
Selecting Photo Files
The easiest way to select photo files for processing is to drag them directly from a Finder window into the table. Entries not yet in the table are added immediately.
Alternatively, you can use the Select… button to add photo files to the table or choose them for processing directly. Your choices will be interpreted in an intuitive way. After you click the button, the standard macOS dialog for navigating in folders will appear. You can choose any folders and files.
- If you select multiple files, they will be added to the table.
- If you select a single file, it will be displayed in the top box. Only this one file will be processed.
- If you select a single folder, it will be displayed in the top box. Once you start processing, the app will scan all files and all folders in the selected folder. All JPEG files found there will be processed. This means you select the “top” folder of a whole hierarchy of any number of files and folders.
It is not possible to select more than one folder hierarchy in a single processing step. If you want to process several folders not contained in each other, you must select them one after the other.
As long as the top box isn’t empty, you can also drag a single item from the Finder directly into it.
All entries in the table can be removed by clicking on the delete icon ×. Alternatively, you can use the key combination ⌘ + ⌫. By clicking a column header in table, the entries of that column will be sorted in ascending or descending order.
JPEG Photo File Date does not need file name extensions like .jpg or .jpeg. JPEG photo files will be recognized correctly even if their name extensions are hidden, missing, or wrong.
Files marked as “hidden” are not added to the table. Also note that when scanning folders, only JPEG files that actually contain a single photo with a date when it was taken can be included, not JPEG files with other types of images.
Choose the Desired Mode of Processing
You can tick the following boxes to indicate the specific type of processing you require:
- Set date of last modification: The program should, if necessary, change the time of last modification stored for that file. The Finder shows such information under the keyword Modified.
- Set date of creation: The program should, if necessary, change the time of creation stored for that file. The Finder uses the label Created when showing this field.
- Fix pure photo folders additionally: The app should process the date fields of the folders which hold the images as well. This option will only take effect in specific situations. For detailed information, please see the section Processing Photo Folders below.
- Dry run only: The processing should only be simulated. No changes will be made to the files, but the app will indicate in the table which changes it would make and which time specifications would be set.
There can be disk volume formats not capable of storing entries for date of creation. In this case, you should remove the check mark for Set creation date.
Computing and Displaying the Results
If you are still collecting files one by one for processing, they will be added to the table with their names and the note not processed yet. As soon as you click Start, processing will begin. If you have selected an entire folder hierarchy, a search process will take place before the actual processing phase, in which all objects in this hierarchy are scanned to see whether they are JPEG photos that can be processed. You can end processing early by clicking the Cancel button.
After processing the selected files has finished, the table will show the respective results:
- Name or sub-path: the name of the respective photo file. If a folder was searched, the path of the file in relation to the topmost folder.
- Image date: if a valid JPEG photo file has been processed, the time specified in that file’s metadata as date when the photo was taken.
- Result: an indication of the current status of this file. The notice also contains a color marker. A gray dot indicates no change, green indicates success, red indicates an error.
Possible Results
Unprocessed Files (Gray)
- not processed yet: The entry was added to the table, but Start has not been clicked yet.
- not necessary: Correcting date specifications is not needed for this file. The time entries for the file match the time the photo was taken.
Cameras usually indicate the recording time at least to the second. However, a short interval may elapse between the moment when the shutter of the camera was released and the image file was saved. Furthermore, depending on the storage medium, operating system and camera, both the file and the photo may specify fractions of a second in addition to the seconds value. The accuracy can be up to a nanosecond, but this cannot be assessed in retrospect. For these reasons, JPEG Photo File Date must use a certain tolerance when comparing time specifications. As long as the difference between file time and recording time is less than 2 seconds, the information is still considered to match. The status is then marked as not necessary.
Successfully Processed Files (Green)
- fixed: The desired date change has been made.
- would be fixed: Changing the time specification is planned, but only a dry run took place.
Errors (Red)
- Image not taken by camera or photo info removed: The file contains a JPEG image with metadata, but the recording date is not specified. Either the image does not come from a digital photo camera or all metadata was subsequently removed. Removal of such data is common for photos published on the Internet. This saves storage space and enhances data protection.
- No photo metadata available: The file contains image information, but no metadata.
- No supported image file: The file either does not contain an image, or uses a file format which cannot be recognized by macOS.
- Not a JPEG file: The file contains a picture, but was not saved complying with the JPEG-JFIF standard.
- The macOS sandbox blocked access: macOS has forbidden the app (not the user) to read the contents of the file.
- The specified time is invalid: The file contains an entry when the picture was taken, but the indicated time cannot be correct.
- This is a multi-image file: The file contains multiple pictures, so the date of capture cannot be defined with certainty.
- failed: Processing was unsuccessful for an unknown reason.
- other messages not listed so far: a file error has occurred, for example because you don’t have permission to read the file. In such a case, the original error message of macOS will be shown.
Additional Features
To select files, you can also use the usual macOS key combination ⌘ + O or the menu item Operations > Select Files…. Processing can be started with the key combination ⌘ + R or be initiated with the menu item Operations > Start Processing.
After you selected a row of the table, you can reveal the associated file in the Finder by clicking the button with the magnifying glass icon. You can also open an image file directly via the table by double-clicking its entry.
JPEG Photo File Date supports the Resume feature of macOS. This feature is active if you have turned off System Preferences > Desktop & Dock > Windows & Apps > Close windows when quitting an application. However, to save disk space, entries in the table will be restored automatically only if the number of 200 items is not exceeded.
Processing Photo Folders
If you have ticked the option Fix pure photo folders additionally, another processing step will be carried out after handling the images, during which the dates for folders will also be corrected, if necessary. Folders are only taken into account if the following conditions apply:
- The folder is immediately enclosing the processed photo files. Folders higher in the hierarchy (i.e. folders that contain these photo folders) are not taken into account.
- The surrounding folder was recognized as a typical photo folder, i.e. it only contains image files and possibly hidden thumbnails or hidden view settings, but no other visible files.
- All image files in the respective photo folder were corrected immediately beforehand or have been considered for correction in a dry run.
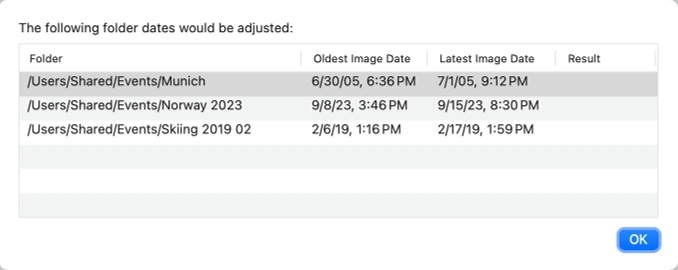
If all of these conditions apply, the following adjustments will be made:
- If the option Set date of last modification is active, the modified date of the respective folder is set to the time the most recent photo in this folder was taken.
- If the option Set date of creation is enabled, the folder creation date will be set to the time the oldest photo in that folder was taken.
Once the dates have been adjusted, you will receive a final report. The respective folders and dates are listed in a table. If no dry run was performed, the table will also indicate whether each change was successful. Folders are only listed in the report if all of the above conditions were met.
If you selected the photos in such a way that only the individual photos, but not their storage folders were included in the original selection dialog, you must confirm access to each individual photo folder. JPEG Photo File Date will obtain this approval for each affected folder that needs to be checked. This is a security measure that Apple enforces on apps from the App Store and cannot be turned off. If you do not grant permission, the affected folder will not be allowed to be processed by the app. In this case the folder is silently omitted.
While searching for JPEG files or processing them, sleep mode of your Mac is automatically blocked to ensure that the running operations are not interrupted.
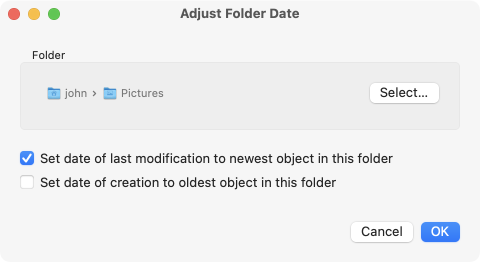
Adjusting Date Settings for Any Folder
The feature to automatically adjust the dates of photo folders during the processing of JPEG files can also be applied individually to any folder.
- You can set the modification date of a folder to the latest object in this folder.
- You can set the creation date of a folder to the oldest object in this folder.
The following additional rules apply:
- Objects include all accessible files and folders that are immediately contained within the respective folder. Nested folders at deeper levels will not be considered.
- The date will not be adjusted if the folder contains no objects or any object with unreadable date settings.
- If the file system where the folder is stored cannot store creation dates, this will be silently ignored.
Perform the following steps to adjust the date settings for a folder:
- Open the menu item Operations > Adjust Folder Date… or press the key combination ⌥ + ⌘ + F.
- Choose one or more folders using the Select… button.
- Check or uncheck the boxes for the date settings you like to adjust.
- Click OK.